
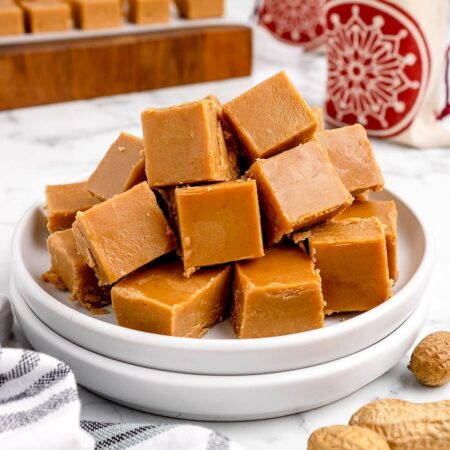
My 2-Ingredient Peanut Butter Fudge is about the easiest fudge you’ll ever make. It’s budget-friendly, it’s fun to make with kids, and there’s no candy thermometer involved.

save this!
Want this recipe?
I’ll email it straight to your inbox!
Plus my weekly recipes. Unsubscribe anytime.
You microwave a jar of creamy peanut butter with a tub of whipped cream cheese frosting, stir until smooth and pour it into a lined pan. Chill it until firm, then cut it into squares. For a smooth finish like mine, I use Jif Creamy.
Why You’ll Love This 2-Ingredient Fudge
There are SO many reasons to love 2-Ingredient Peanut Butter Fudge. First, you’ll love these simple ingredients: creamy peanut butter and whipped cream cheese frosting. It’s a budget-friendly treat, and I’m sure we can all agree that saving money is important these days.
It’s also incredibly easy to make. You don’t need any special equipment or fancy cooking skills. A microwave-safe bowl, a baking pan, and a few minutes of your time and you’re in business.

Another reason to love this peanut butter fudge is how easy it is to change up.
You can easily customize it with different variations and add-ins to suit your family’s taste. Plus, it’s a great recipe to make with kids since it’s straightforward and fun. Finally, the creamy texture and rich peanut butter flavor make it a crowd-pleaser that everyone will enjoy.
How to Make 2-Ingredient Peanut Butter Fudge
Making 2-Ingredient Peanut Butter Fudge is a breeze. The process is quick, and you’ll have a traditional fudge ready to enjoy in just a couple of hours. Here’s how to make this easy dessert:
Ingredients
To make this fudge, you’ll need the following ingredients:
- 1 (18 ounce) jar of creamy peanut butter
- 1 (12 ounce) container of whipped cream cheese frosting

Step-by-Step Instructions
Here are the step-by-step instructions to make your delicious fudge:
Step One: Line an 8-inch square pan with parchment paper or aluminum foil, ensuring there is enough overhang for easy removal later. This step is crucial for getting the fudge out of the pan smoothly once it’s set.
Step Two: In a microwave-safe bowl, combine the creamy peanut butter and the whipped cream cheese frosting. Make sure both ingredients are at room temperature for easier mixing.

Step Three: Heat the mixture in the microwave on high for 30 seconds. Remove the bowl and stir the mixture thoroughly. Microwave again for another 30 seconds. Stir until the mixture is smooth and well blended.
Step Four: Working quickly, pour the fudge mixture into the prepared baking pan. Use a small offset spatula to spread it evenly. For an even smoother finish, dip the spatula in hot water before spreading.

Step Five: Refrigerate the fudge for about 1 hour, or until it is fully chilled and set. This step ensures that the fudge firms up properly and is easy to cut.
Step Six: Once the fudge is set, remove it from the pan using the parchment paper or foil overhang. Place it on a cutting board and cut it into 1-inch squares using a sharp knife. Wipe the knife with a damp towel between cuts to keep the pieces clean.
Substitutions and Variations
This basic fudge recipe is highly adaptable. Here are some substitutions and variations you can try:
- Almond Butter: For a different nutty flavor, substitute almond butter for peanut butter. Again, the texture may turn out different than what I have pictured here.
- Chocolate Peanut Butter Fudge: Add a swirl of melted chocolate or use chocolate frosting instead of cream cheese frosting for a chocolatey twist.
- Crunchy Peanut Butter: Use crunchy peanut butter for added texture and a bit of crunch in every bite.
- Vanilla Frosting: While I think cream cheese frosting gives the best flavor, if you can’t find it, regular vanilla frosting can be a good alternative.
- Add-Ins: Mix in white chocolate chips, chopped nuts, or even a sprinkle of sea salt on top for extra flavor and texture.
My Best Tips
To ensure your sweet treat turns out perfectly every time, here are some helpful tips:
- Room Temperature Ingredients: Make sure both the peanut butter and frosting are at room temperature before mixing. This helps them combine more easily.
- Smooth Finish: Use a small offset spatula dipped in hot water to smooth the fudge mixture in the pan. This prevents sticking and creates a nice, even surface.
- Proper Cutting: Use a sharp knife to cut the fudge into squares. Wipe the knife clean with a damp towel between cuts to keep the pieces looking neat.
- Quick Setting: If you’re in a hurry, place the fudge in the freezer for about 20-30 minutes to speed up the setting process.
Storage Instructions
Proper storage is key to maintaining the freshness and texture of your fudge. Here’s the best way to store it:
- Airtight Container: Place your cut fudge squares in an airtight container. This prevents them from drying out and keeps them nice and fresh!
- Room Temperature: The fudge can be stored at room temperature for up to a week. Ensure it’s kept in a cool, dry place away from direct sunlight.
- Refrigeration: If you prefer your fudge chilled, store it in the refrigerator. This can extend its shelf life to about two weeks.
- Freezing: For longer storage, you can freeze the fudge. Wrap the squares individually in parchment paper and then place them in a freezer-safe bag or container. It can be frozen for up to three months. Thaw at room temperature before serving.

Frequently Asked Questions
Here are some common questions and answers about making 2-Ingredient Peanut Butter Fudge:
Can I use crunchy peanut butter instead of creamy?
Yes, you can definitely use crunchy peanut butter if you prefer a bit of texture over a creamy fudge. It adds a nice crunch to each bite.
What if I don’t have whipped cream cheese frosting?
If you don’t have whipped cream cheese frosting, you can use regular cream cheese frosting. Just make sure to whip it well before mixing with the peanut butter.
Can I add other ingredients to this fudge?
Absolutely! You can add a variety of mix-ins like chocolate chips, nuts, or even a swirl of caramel or chocolate for added flavor. If you love peanut butter and chocolate together, my Buckeye Balls are another easy no-bake favorite.
How do I cut the fudge cleanly?
Use a sharp knife and wipe it with a damp towel between cuts. This helps keep the edges clean and prevents the fudge from sticking to the knife.
How long does 2-ingredient peanut butter fudge need to chill before serving?
The fudge needs to chill for about 1 hour in the refrigerator to set properly. For a quicker option, you can place it in the freezer for 20-30 minutes.
Is it necessary to line the pan with parchment paper?
Yes, lining the pan with parchment paper or aluminum foil is recommended. It makes it easier to remove the fudge from the pan and prevents sticking.
Can I use other types of frosting?
Yes, you can experiment with different types of frosting like chocolate or vanilla. Each will give a unique flavor to the fudge.
Is 2-ingredient peanut butter fudge gluten-free?
This recipe is generally gluten-free, but always check the labels of your ingredients to ensure they do not contain gluten.
What if my fudge is too soft?
If your 2-ingredient peanut butter fudge recipe is too soft, try chilling it for a longer period or placing it in the freezer for a few minutes. Ensure that the peanut butter and frosting are properly mixed and heated.

This really is the easiest peanut butter fudge. It has a full, rich, peanut butter flavor. With simple ingredients and minimal effort, you can make a creamy, rich fudge that hits the spot. If you love a recipe this simple, my 3-Ingredient Peanut Butter Cookies are just as easy. I love making this fudge for both Thanksgiving and Christmas, but, it’s perfect any old time! Hope you love it! 🥜
More Easy Fudge
2-Ingredient Peanut Butter Fudge
Video
Ingredients
- 1 (18-ounce) jar creamy peanut butter
- 1 (12-ounce) container whipped cream cheese frosting
Instructions
- Line an 8-inch square pan with waxed paper, making sure there is overhang for easy removal; set aside.
- Add the creamy peanut butter and jar of cream cheese frosting into a microwave-safe bowl. Heat the mixture in the microwave on high for 30 seconds. Stir mixture and heat for an additional 30 seconds. Stir until smooth and thoroughly blended.
- Working quickly, pour the fudge mixture into the prepared baking pan. Refrigerate until chilled, about 1 hour. Remove fudge from the pan using the waxed paper overhang. Cut into 1” squares.
Notes
Nutrition
Nutrition is an estimate from an online calculator, not medical advice, and depends on your portion size.


A gift for you
deck the halls
Free recipe book
One little book, twelve recipes, zero guessing. Every recipe printable, freezer chart included. Free.
It’s on its way! Check your inbox (and Promotions) for your free cookbook.
Free. Unsubscribe anytime.



Easy and delicious.