
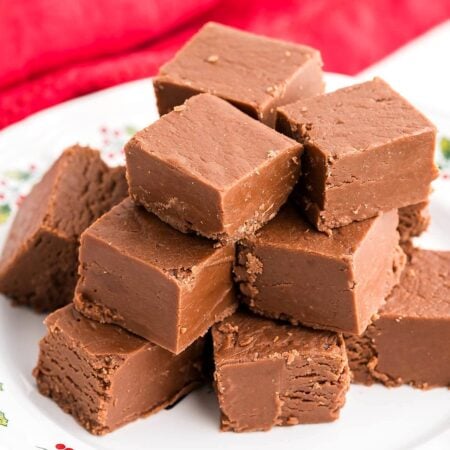
This Fantasy Fudge is the one my grandma called her special marshmallow fudge, and it’s still a Christmas season favorite at our house. It’s an old recipe from the back of the marshmallow creme jar (Kraft’s Jet-Puffed), and this classic recipe has truly stood the test of time.

save this!
Want this recipe?
I’ll email it straight to your inbox!
Plus my weekly recipes. Unsubscribe anytime.
With just a few simple ingredients, you boil sugar, butter and evaporated milk for exactly five minutes, then stir in chocolate chips, a jar of marshmallow creme and vanilla. The marshmallow creme keeps it smooth and creamy, so you don’t need a candy thermometer. Pour it into a lined pan, let it set and cut it into squares.
Christmas time is my favorite time of the year to make it. I love to bring a big plate to holiday parties, and I also pack it into vintage Christmas tins and give it away to friends and family as holiday gifts, which makes it one of my favorite Christmas candy recipes.
What You’ll Learn
- How to make the original Fantasy Fudge recipe from the marshmallow creme jar.
- Why the exact 5-minute boil matters, and why you don’t need a candy thermometer.
- How to avoid grainy fudge or fudge that won’t set.
- How to store, freeze and gift it.
Why Marshmallow Creme Fudge Works
The marshmallow creme is what makes this recipe so reliable. It helps keep the fudge smooth instead of grainy, so you get creamy chocolate marshmallow fudge every time you follow the steps. That’s why so many families have made this old fashioned fudge for generations, and why I still make it the same way my grandma did.
Fantasy Fudge Ingredients

You’ll find the exact amounts in the recipe card below.
- Sugar: Granulated sugar gives the fudge its sweetness and structure as it cooks.
- Butter: It adds richness and a smooth, creamy texture.
- Evaporated milk: It helps dissolve the sugar and gives the fudge a silky texture. Be sure to grab evaporated milk, not sweetened condensed milk.
- Semi-sweet chocolate chips: One 12-ounce bag brings rich chocolate flavor and helps the fudge set up firm.
- Marshmallow creme: Sometimes called marshmallow cream. One 7-ounce jar of Jet-Puffed marshmallow creme keeps the fudge soft and smooth.
- Vanilla extract: It rounds out the flavor and makes the chocolate taste even richer.
- Chopped nuts: Totally optional, but walnuts or pecans add a nice crunch.
How to Make Fantasy Fudge
Here are my step-by-step instructions.
Step one: Spray a 9-inch square pan (a 9×13 works too) with cooking spray, then line it with parchment paper, leaving overhang on both sides so you can lift the fudge out later.


Step two: In a medium pot, stir together the sugar, butter and evaporated milk.
Step three: Bring the mixture to a full rolling boil over medium-high heat, stirring constantly so it doesn’t scorch. I use a wooden spoon.
Step four: Boil for EXACTLY five minutes, stirring the whole time. Set a timer! This is the step that makes perfect, creamy Fantasy Fudge.
Step five: Remove the pot from the heat. Working quickly, stir in the chocolate chips until they’re completely melted.


Step six: Stir in the marshmallow creme and vanilla. Some people use regular marshmallows in a similar recipe, but I stick with the jar, just like the original.
Step seven: Stir in the chopped nuts if you’re using them. During the holiday season, I usually make one batch with nuts and one without.
Step eight: Quickly pour the fudge into the prepared pan, scraping the sides of the pot. Let it cool completely before cutting it into small squares.

save this!
I’ll email it, plus my weekly recipes.
My Best Tips
- Skip the candy thermometer: You don’t need one, as long as you follow the steps exactly.
- Wait for a full rolling boil: That’s a full boil that keeps bubbling even while you stir. Start your timer then.
- Stir constantly: Steady stirring keeps the bottom from scorching and helps prevent grainy fudge.
- Work fast at the end: Once the chocolate goes in, the fudge starts to set, so have everything measured and ready.
- Use room temperature ingredients: They blend together more smoothly. Just say no to grainy fudge!
- Cut clean squares: Lift the fudge out by the parchment and cut it with a large, sharp knife.
Variations
- Nuts: Crunchy walnuts are classic for chocolate walnut fudge, but pecans, almonds or hazelnuts are good too.
- Flavored extracts: Swap the vanilla for almond, peppermint or orange extract.
- Milk chocolate: Use milk chocolate chips instead of semi-sweet for a sweeter take on chocolate fantasy fudge.
- Thicker fudge: Use the 9-inch pan. The 9×13 makes thinner squares.
- Peanut butter chips: Swap in peanut butter chips for peanut butter fantasy fudge. I haven’t tried this one myself yet, but it’s a popular twist.
Love easy fudge recipes? Try my Easy 3 Ingredient Fudge. And if you’d like another old fashioned fudge, my Evaporated Milk Fudge uses mini marshmallows instead of marshmallow creme.

How to Store Fantasy Fudge
Wondering how long fudge lasts? Here’s how I store mine.
Room temperature: Keep the fudge in an airtight container at room temperature for up to one week. Place parchment or wax paper between layers so the pieces don’t stick together.
Refrigerator: For firmer fudge, store it in an airtight container in the fridge for up to two weeks. Let it sit out for about 15 minutes before serving so it softens a little.
Freezer: Yes, you can freeze Fantasy Fudge. Wrap it tightly in plastic wrap, then put it in a freezer-safe container for up to three months. Thaw it overnight in the fridge or on the counter.
Gifting: When I fill my vintage Christmas tins, I stack the squares in layers with parchment between them so they look pretty when the lid comes off.

Fantasy Fudge FAQs
Do I need a candy thermometer?
No. As long as you bring the mixture to a full rolling boil and boil it for exactly five minutes, you don’t need one.
Why is my fudge grainy?
Grainy fudge usually comes from sugar crystals that didn’t dissolve. Stir constantly while it boils, make sure it reaches a full rolling boil, and use room temperature ingredients.
What if my Fantasy Fudge turns out too soft?
If your fudge doesn’t set, the sugar mixture probably didn’t boil long enough. Next time, wait for a full rolling boil over medium-high heat and boil it for the full five minutes, stirring the whole time.
Can I use Marshmallow Fluff instead of marshmallow creme?
Yes. Marshmallow Fluff is a marshmallow creme too, so it works the same way. Use about 7 ounces, or 1½ cups.
Should you use parchment paper when making fudge?
Yes. Lining the pan with parchment makes it easy to lift the whole block out and cut neat squares.
Fantasy Fudge is such a sweet treat, and this easy fudge recipe is about as close to no-fail fudge as it gets. Make a batch of this Christmas fudge for your next holiday party, or tuck it into a Christmas tin for someone you love. Hey, it might even start a new family tradition.
More Homemade Candy
- Old-Fashioned Pecan Pralines
- Evaporated Milk Fudge
- Maple Walnut Fudge
- Velveeta Fudge
- Sugar Cookie Fudge
- Easy Peanut Butter Fudge
- Buckeye Balls
Original Fantasy Fudge
Video
Ingredients
- 3 cups sugar
- ¾ cup butter
- ⅔ cup evaporated milk
- 2 cups semi-sweet chocolate chips
- 1 (7-ounce) jar marshmallow creme 1½ cups
- 1 teaspoon vanilla
- 1 cup chopped nuts optional
Instructions
- Spray a 9×9 (or 9×13) pan with cooking spray. Next, line with parchment paper, leaving overhang on both sides so you can easily lift the fudge out when it’s done.
- In a medium pot, mix sugar, butter and milk.
- Bring the mixture to a full rolling boil using medium-high heat, stirring continuously to prevent scorching.
- Boil for exactly five minutes. This is important! Set a timer!
- Remove the mixture from the heat. Working quickly, stir in chocolate chips until smooth.
- Add the marshmallow creme and vanilla.
- Optionally, add nuts.
- Pour into the prepared pan; allow to cool completely before cutting into squares.
Notes
Nutrition
Nutrition is an estimate from an online calculator, not medical advice, and depends on your portion size.

A gift for you
deck the halls
Free recipe book
One little book, twelve recipes, zero guessing. Every recipe printable, freezer chart included. Free.
It’s on its way! Check your inbox (and Promotions) for your free cookbook.
Free. Unsubscribe anytime.



Can I add rum to this recipe to make run fudge?
Hi Lisa, I have no idea if that would work or how much you could add. You’d have to try it.
Hi. Does it need a pinch of salt? Thank you.
I don’t add salt but I’m sure it would be good. :)
What temperature do I put the oven on and for how long?
There are no oven instructions for this recipe. It is made on the stovetop.
My fudge turned out perfect! I followed the recipe exactly and the fudge was smooth and creamy not grainy! Great recipe!!
Yay! Following it exactly really does make all the difference. So glad it turned out perfect!
I have made this fudge for years. I started making it when I was 15 years old. Now I’m 73. I have substituted a 16 Oz jar of Creamy Jif peanut butter for the Semi sweet chips and it is still requested every year when I make candy and cookies for the holidays. I also have used Butterscotch chips in place of the semi sweets. It is all delicious. A Never failed recipe.
Since you were 15, wow! That’s the best kind of review. Thank you for sharing your peanut butter and butterscotch versions.
I made #8 last night. This is my mom’s recipe from over 70 years ago. It’s our favorite. No other fudge is better. I load it with chopped pecans. My husband loves it.
I have made this for many decades now. Only differences are I double it, use milk chocolate chips and double the vanilla. Use the 13”x9” pan, obviously. No other fudge recipe can compare to this one! You can make different kinds by switching the flavor or chips you use. I have made peanut butter, white chocolate, butterscotch, and so on. A good double decker is peanut butter and milk chocolate. Pour one over the top of the other. Good stuff. 5 minutes cooking is not that bad at all. Worth it for perfect fudge! Enjoy!
I’ve been making this fudge for years and everyone loves it. I make enough for all my sisters employees to have some between Thanksgiving and Christmas, I love to Cook and bake at anytime of the year
Just made.Tastes great.
Been trying to find original recipe. Ta Da!!! I found it now need to find peanut butter fudge???
Tàmmy I use reese peanut butter chips or a cup of jiff peanut butter. Make sure you don’t use light butter or light peanut butter because it will make it very sticky and it’s not as good either.
Hi Tammy! Thanks to Martha for the tips. You might also love my Easy Peanut Butter Fudge.